Monday, 30 September 2013

Managing colour

This exercise involves looking at photos with a significant colour cast and “correcting it”.  My usual preferred software is Photoshop for JPEG images and Digital Photo Professional for RAW. I decided to process the images using this known software.
Image 1
This photo was taken on a misty morning where I had left the white balance set to daylight giving the image a blue tinge.
Original
1/125 F3.5 ISO200 18mm partial metering daylight white balance
partial metering– sky cropped (x1.6 crop factor)
JPEG
JPEG blacks set on histogram - grey dropper tool in curves
touched on mudguard –  sky cropped 
 
RAW
RAW blacks set on histogram – white balance altered
 to cloudy – sky cropped

By warming up the colour, the blue of the rucksack became slightly yellower in colour. The T shirt reverted back to brown instead of looking black. There is not much difference between the jpeg and RAW. If anything, the RAW looks more natural.
Image 2
This has a significant green tinge to it.
Original
1/15 F4.5 ISO100 24mm (x1.6 crop factor) 
daylight white balance evaluative metering 

JPEG


The JPEG image was altered using the grey dropper tool. I did not expect to find any grey, but clicking on various rocks on the path changed the colour.


RAW
To alter the RAW image, the white balance tool did not help at all because the colour was already warm. Using the RGB tone assist on my RAW software, I was able to select the individual colours and increase or decrease them. Blue – increased, Green – decreased, Red – decreased.
I prefer the RAW image colours as they are warmer and I had more control over the image.
Image 3
This was a location shot  (JPEG only)for reference for a previous assignment. The sky was heavy with snow so I had taken a smaller camera out to record the location.
1/800 F4 ISO400 evaluative metering, auto white balance

By sliding the black and white parameters inwards as it is a low contrast image and using the grey dropper tool on the grey foreground snow, the colours have changed from a grey tinge on the snow to white snow.

In summary, I realised how colour cast can easily be managed. I  found that a few images which I had left on my computer unedited because I wasn't quite sure what to do with, could be improved quite easily. The process for editing a JPEG and a RAW image was simple, and with patience, I am sure my images could both look more similar. My feeling is that it is still better to get it right in camera where possible.

Wednesday, 4 September 2013

Scene Dynamic Range

This exercise involved looking at a scene, taking a photograph and measuring the brightest and darkest areas within it. I started off at the beach, thinking that I could find different types of lighting and subjects to measure. As the weather turned stormy, I had to postpone the exercise for fear of sand blowing into my camera.
Image 1
This image shows  boats moored to a jetty. The tide was going out and the sun was shining on to the boats, enhancing the darks and whites but there was no visible shadow. The boat on the right had a couple of black tyres for fenders so that gave me black to measure. I decided to use manual mode because I could set the aperture to include most of the image in focus. I set the camera on a tripod and took a couple of test shots to ensure that the highlights did not flash and checked the histogram. I took the image and then took the camera off the tripod to spot meter areas of the scene.
1/125 F16 ISO100 32mm
I was surprised that the camera only showed a dynamic range of 3x F stops 1/90-1/125-1/80. I had expected a greater variance between the measurements. I wondered whether other cameras had more shutter speed choice but had only taken this one with me.
Fyre (2009), p44 suggested that if using a polarising filter one should “add one and a half to two stops of light for a polariser.” I decided to check this theory as it could be a useful tool to consider. Having left the tripod in the same place, I re-mounted the camera, screwed in the polarising filter and took similar images. Using 1/125 with the polariser full on or half on was about one and a half to two stops darker. Using Lightroom and increasing the exposure by two stops moved the histogram back into the middle of the graph.
The other discovery I made was that what I thought was a good exposure (no highlight flashing and histogram ok) when looked at in detail in lightroom showed areas of blue (underexposed). I had used the middle of 3 settings on my camera (1/180 – 1/125- 1/90) which had appeared OK. By using a polariser, the blue areas had disappeared, so the image was better exposed.
image     image
 image   image

Image 2
The sun was still behind me although the light was dappled because of the tree canopy. At this point the clouds were building up so I had to wait for what I thought was the same light to measure the exposure in my camera. I mounted the camera on a tripod because 1/10 was too slow to handhold the camera. The problem I encountered was not being able to read the back of the camera easily. Even though an angled eye piece could be attached to the camera, it didn't solve the problem of reading the histogram!

F16 1/10 ISO100 18mm
I expected a greater dynamic range between the light and dark with this scene too. My camera measured 3 F stops (1-8-1/10-1/15).
Image 3
By the time I took this image, the weather was quite cloudy.

F16 0.7secs ISO100 20mm
My camera displayed a dynamic range of 9 F stops (6 secs, 4 secs,3 secs, 2 secs,1.5 secs, 1 sec, 0.7 secs, 0.5 secs, 0.3 secs) I had to “overexpose” this by 2 stops to match the colour of the tree bark with the colour which my camera saw. The colours at 3 seconds were good and if I did not know what the tree looked like, I would have assumed they were accurate.
Image 4
The brief suggested including a light source in the scene to give a high dynamic range. I looked inside my fridge as an experiment. I found the dynamic range (at ISO 400) was 16 F stops. (8 secs,6 secs, 4 secs, 2 secs, 1.5 secs, 1 sec, 0.7 secs, 0.5secs, 0.3secs, 1/4, 1/6, 1/15, 1/20, 1/45, 1/60, 1/90)


F4.5 1/90 ISO400 20mm Tungsten white balance
I questioned whether if I had used ISO 100 the dynamic range would be the same or less because the sensitivity of the film is less. I was unable to answer this question so I re took the photo.
The camera measured the scene at F3.5 at 1/8 which had highlight clipping from the fridge light. I set the camera into manual mode with an aperture of F3.5 and worked through decreasing the shutter speed until I had no highlight clipping (1/20). I was unable to repeat this in AV mode to spot meter different areas. I increased the aperture to F8, and the camera once again measured the exposure incorrectly (1/45). By working in manual mode, I reduced the exposure time to 1/6 so that the image was visible with no highlight clipping from the light. Again, I was unable to repeat this in AV without altering the ISO or aperture. I concluded from this that on these occasions a light meter would be a useful piece of equipment.
Image 5
Having spent time working through this exercise, this image is more or less as I expected the dynamic range to be represented.( See previous exercise. I decided to retake a similar scene as I felt I needed to "re-do" the exercise to understand it better.)
1/20, 1/30, 1/45, 1/60, 1/90, 1/125, 1/180 equals a dynamic range of 7 F stops.


F11 1/180 ISO100 28mm

Reference
Digital Landscape Photography – in the footsteps of Ansel Adams and the great masters, Fyre M (2009) p44, Ilex press, Lewes, UK

Your camera’s dynamic range

8th August 2013

This exercise was designed to measure the dynamic range of my camera for a high contrast scene. The instructions suggested using a scene with at least one brightly reflecting surface, bright sunlight and an area of deep shadow with a dark surface. I set up a situation similar to the image in the course material with a sheet of A4 white paper next to the back door. After waiting for the sun to create a shadow across the scene, I spot metered areas of the scene using the camera set to AV.

F9.5 1/180 ISO 100 14mm

I spot metered three areas and made a record as to what I was seeing. The lowest value was 1/20, the highest value was 1/180. Between this there are 7 stops:
1/20, 1/20, 1/45, 1/60, 1/90, 1/125, 1/180

Camera forums suggest my camera (Canon 1000D) has a dynamic range of 11 x F stops. Although my camera suggested 7 stops for this exercise, I think it varies with the brightness of the light (for example, on the day I did this exercise, the light was changing rapidly. I had to wait for the sun to come out from behind the clouds at which point the camera speed was faster (1/250 compared to 1/180) but the shadow remained the same speed.
As I took the image in RAW, I was able to view the colour values of the white paper in photoshop. R = 249, G = 243, B =242. As these add up to less than 255 x 3, the area is not overexposed. In the shadow area, adjusting the exposure of the window frame until it was visible meant increasing it by 2 stops. I am not really sure why I did this, apart from the fact it was part of the exercise. Following feedback from Assignment 1, I installed Lightroom on my computer. This shows the histogram and the areas of highlights (burnout) and shadow detail which may be unrecoverable in different colours and I have found it invaluable for checking whether a photo I thought was correctly exposed actually is. I felt at the end of this exercise that I perhaps needed to something similar again, so I sought out a similar type of scene as part of the following exercise (scene dynamic range)
I read around the subject of dynamic range. I knew already that when films were processed the image was built up like using layers in photoshop. I was aware that some digital cameras have the capability of taking three similar images like auto bracketing and merging them together to create an HDR image (merging highlights and lowlights). I had read that software was available to do this in the processing stage for cameras which did not have this capability. Freeman (2011) explains that “as the charge in the photo-diode “well” is filled up, the highlights are blocked and it is as if you have a hole in the image – or triple 255 when measured in RGB.” 
From learning about the histogram and dynamic range, I observed that the histogram on the back of my camera clips when one or two of the channels are near the top of the graph. This was backed up by Freeman (2011) who explained that “clipped highlight warnings displayed  in a camera’s LCD are likely to be at a value of less than 255”
References
Freeman. M, (2011) The digital SLR handbook, Ilex press, Lewes, UK (p46)
Freeman. M, (2011) The digital SLR handbook, Ilex press, Lewes, UK (p48)

Your tolerance for noise

In order to get the most out of this exercise, I needed to understand what noise was. I knew that there was a relationship between the amount of graininess on an image and the sensitivity of the film (ISO) but not what caused it or how to avoid it. I was aware that on processing an image in RAW software (DPP), the programme knew if I had used a Canon lens and suggested noise reduction. Frye (2009), explained that “noise is not evenly distributed: it’s more prominent in shadows.” He suggested it is “exacerbated by high ISO’s and long exposures.” His remedy for noise is prevention by using the correct exposure, and if that is not possible to take two or more images and combine in software or use noise reduction software. I agreed with the fact that correct exposure where possible is the best option, but still needed to understand the issue further in order to know how to avoid it. I was unaware that my camera could help with long exposure noise.

Looking at the Canon customer support website (as there was nothing in my camera manual), I found that I had two custom functions for noise control. One allowed me to turn on or off noise reduction for long exposures and the other allowed noise reduction at high speed ISO.
By reading around the subject further, I discovered that noise is unwanted detail which is visible as a graininess on the image. It occurs when the image is taken because “artefacts or errors are introduced into the image by electrostatic charge”. Freeman (2011) Freeman describes 5 different types of noise in his book, photon noise, readout noise, random noise, dark noise (long exposure noise) and reset noise. I had not appreciated before studying this exercise how a camera’s sensor works and that when a speck appears on an image, if it isn’t a dust spot it is likely to be photon or random noise.
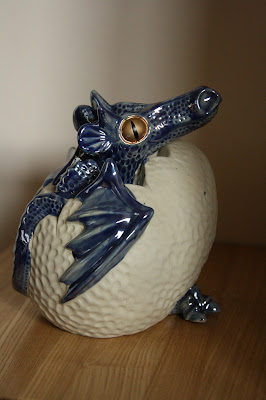
This exercise involved combining sharp detail and textureless areas (for example a white wall) where some of the textureless area was in shadow with daylight indoors to investigate a range of ISO the relationship between ISO and noise with my camera. Aperture priority, a tripod and exposure times of less than 1/2 second were required so that noise from long exposure was not an issue.
ISO 100


F4 1/10 ISO 100 47mm
This image is acceptable quality to me. There is no graininess around the image, even in the shadows.

ISO 200


F4 1/20 ISO 200 47mm
                                   

At ISO200, there is some noise starting to appear in the darkest shadows as grain. Compared to ISO 100, it is quite noticeable. If I was taking an indoor scene on a tripod, I would probably not use this setting.
ISO 400


F4 1/45 ISO 400 47mm


At ISO400, noise is showing on the egg. The dragon’s feet are of an unacceptable quality. If I was shooting indoors with no tripod, I would use this setting. Having looked at where noise appears, it is now something to be aware of.
ISO 800
F4 1/90 ISO 800 47mm

                                                            
At this ISO sensitivity, there is noise showing under the dragon’s eye. The table is unacceptable – the area is too grainy looking. The noise immediately appears worse on the plain areas of wall which are in the shadow.
ISO 1600


F4 1/180 ISO 1600 47mm


This image looks very noisy. It is present around the eye which is not visible in the previous photos. I think the eye itself shows little noise present because the texture masks the effect of the noise.  This photo is definitely unacceptable.
Having completed this exercise and compared the results at different ISO speeds, I agree with the quote from Frye (2009) cited above, that “noise is not evenly distributed: it’s more prominent in shadows.” I would qualify this by explaining that it seems that there is a  relationship not only between the sensitivity (film speed) and amount of noise, but also the darker the area in the photo, the more noise is visible.
References
Freeman, M, 2011,The digital SLR handbook, Ilex Press, Lewes, UK P58
Frye, M, 2009, In the footsteps of Ansel Adams and the great masters, Digital Landscape Photography, Ilex Press, Lewes, UK P14
http://www.canon.co.uk/support/consumer_products/products/cameras/digital_slr/eos_1000d.aspx?faqtcmuri=tcm:14-782478&page=1&type=faq accessed 27/8/13

(29/8/13 – On viewing my photos from today, I have several images which demonstrates photon/ random noise in the same area. I took two sets of images; one at F11 ranging from 1/100 to 1/750 ISO 100, and the pixelated area appeared at nearly the same place on all of them (right spire). The other set,  taken at F19 between 1/90 and 1/180 at ISO100 also show the same pixelated spot. As the value of RGB at this pixel adds up to 227 with red being the highest, I did not think it was from a channel being blocked (although the histogram was clipped to the left (shadows). I think it is unacceptable noise.)