Response to Tutor Feedback Assignment 1, August 2013
Overall Comments
Very pleased with the comments from my tutor. Clear guidance on where I can improve which is helpful. Tutor comments: “You have clearly taken a methodical approach to the assignment and the methodology you have generated will stand you in good stead in the future. You may wish to consider looking at Adobe Lightroom as a software for processing both your raw files and organizing your photo library.”I have a copy of Adobe Lightroom software package for processing both raw files and organizing my photo library which I will run on my laptop and see how it works before I purchase a more up to date copy. (15/9/13 I installed lightroom V2.7 and have worked with it throughout part 2.)
Feedback on assignment
Tutor comments: “The assignment is very clearly laid out. The detail given is thorough and you have justified decisions made. The reflection right at the end is a good way to end the assignment. I would add a bit more of a critical reflection here. Think about anything that you need to work on further. This could be a technical matter, an artistic matter e.g. composition or something more to do with an understanding/appreciation of photography. The most important part of the workflow is your preparation. This has been carefully thought about and is an essential (and often neglected part of the shoot). Making sure all the kit is there, in working order is essential for this type of work. I haven’t commented too much on the images, as on both the blog and the work document images 1 – 7 and 12 are quite fuzzy. The final images make a good break from the action shots earlier in the set. The end image also draws the sequence to a good conclusion. Care has been taken with the composition, and this is seen in the action shots.”
Looking at the images on my blog, they are fuzzy and I am not sure why as they were taken directly from my laptop onto Windows Live Writer before being uploaded to Blogger. (5/9/13 I found that I have to delete them from windows live writer import them straight onto blogger.) I am glad I re-took my assignment photos because care and attention to detail has paid off. My conclusion is always the weakest part of my essay, so having some guidance is very helpful. I will follow this for my next assignment.
Learning Logs or Blogs/Critical essays
Tutor Comments: “The blog is very clearly laid out and the tabs at the top make navigation easy. You may wish to have a tab for the assignments – so they can easily be accessed one after the other for formal assessment.” To do: separate page for assignments. (Done August 2013)
Suggested reading/viewing Tutor Comments
“On your blog there is nothing included under the exhibitions or reading tabs. Do remember to add to these to show any research/background reading that you have been doing. These doesn’t need to be directly related to Digital Photographic Practice – the research can be on any aspect of photography and helps to show that you have an all round interest in the subject. The assignment has been well referenced – I would consider putting together a sheet of research images that show how you used mountain biking images. A list of bullet points could help to clarify the key points that you pulled from the research. Although not specifically a mountain bike photographer you may like the work of Chase Jarvis, who is an American lifestyle photographer who photographs many extreme sports. He has a good website with a blog that has loads of information on it!“ http://www.chasejarvis.com/
Follow up work:
- Visit Photography Exhibition in Southwell to include on exhibitions page. (Done August 2013)
- Research sheet of images/bullet points to show how I used mountain bike images
- Add what I'm reading to page on blog (Done 15/9/13)
- Look at the work of Chase Jarvis (15/9/13 need to write up)
For this assignment, I decided to develop the theme I started with Exercise 2: Your Own Workflow 2 and Exercise: Editing. I am interested in mountain biking (MTB) and had spent time previously reading MTB specific magazines looking at images, thinking I ought to learn some basic MTB photography skills. With my husband increasing the amount of riding he does preparing for races, and my son just learning, I was keen to adapt my motorbike racing photographic skills and look at this subject area with willing models. Having learnt basic MTB photography skills following a workflow of developing my skills by research, practice, evaluating and more research, I organised a MTB ride with my husband and son with the aim of producing 6-12 images for my assignment. I wanted images which would narrate a story, so I planned an evening using the downhill section at the trail centre.
During this assignment, I looked at creating an effective workflow all the way through from planning to the final 6-12 images. I considered how my workflow may differ from other photographers in this area, and explained why I made some adaptations to my original work flow. I devised a flow chart to enable my planned session to work fluently from planning to the final displayed image. To make the flowchart more manageable, I broke it down into five separate flowcharts and described my actions for each one.
Flowchart 1: Preparation

The first flowchart looked at preparation. Living close to a trail centre in Sherwood Forest meant I was able to utilise the trails on weekdays and evenings when the section was least busy. Having decided what type of images I wanted, I planned a session with the riders to discuss my ideas and available location (fine detail as in type of track, whether jumps were possible and whether there was access for me as a photographer without being injured). The weather forecast was important too, because I did not want the riders becoming cold and wet. I needed the lighting to be as bright as possible because I thought noise was distracting on these types of images. Sunlight through trees or bright sunlight is challenging too, so I decided on early mornings or evenings. I planned the session for a Saturday evening.
I had charged camera batteries in preparation, set my camera to the following basic settings: TV, continuous shooting, AI Servo focussing, ISO200 and shutter speed of 1/125. To enable my camera to work as fast as possible, I could only work in jpeg. The 24-105mm lens was cleaned, checked for dust spots and fitted along with the 10-20mm lens which was placed in the bag. I fitted the flash with new batteries and checked the memory card in use had enough space along with two formatted ones in the bag. I had learnt that a dustbin sac was important piece of kit for preventing stings, splinters and dirt. The final piece of organising was checking my bike was in good working order with tyres pumped, bag, drink and helmet ready.
I think this part of the flowchart worked well for me. With hindsight, I would look at the colour of the clothes the rider is wearing. On this occasion, my husband had a different top on and I had not considered the effect of the colour against a blue sky background. It meant in some instances there was little contrast.

Knowing my basic setting helped set up my camera quickly. Shooting a few images and reviewing the histogram and display for burnout and highlight clippings in the back of the camera allowed me to check the settings. The speed and direction of the bike had an impact on the camera settings, and the amount of available light meant the ISO setting needed reviewing. Satisfied with the increase in ISO I took more images, reviewed them in camera and moved on to the next section of track. Gulbins et al (2010) suggest that “select settings>shoot>review your preview image and check histogram>adjust settings>shoot…”is part of a basic series of shooting steps which one will often follow.
The downhill section was always going to be the most challenging section for the riders and me, especially as the weather was so hot. There were three sections of track I wanted to cover in this area: a rock garden, fast berms and a jump. I took each section, took a basic set of images to work out positioning and camera settings, reviewed in camera by checking the histogram, and then let the rider loop round a few times. After checking the camera display in detail, we moved on to the next section. At the end of the downhill section, the riders took a well earned break whilst I checked my images in camera. I had originally considered packing the tablet to review the shots in larger detail, but because the weather was so bright and sunny, it was easier to use my camera. Having reviewed the images, I thought I had enough images to move on to the cool down section. As my son was becoming tired with the heat, I had to revise my last location for a flatter venue.
With the last set of images complete, we headed home. I wrote this section of the flowchart to be as flexible as possible, fitting in with my mine and the riders’ needs. It works for me because it can be looped round as many times as necessary.
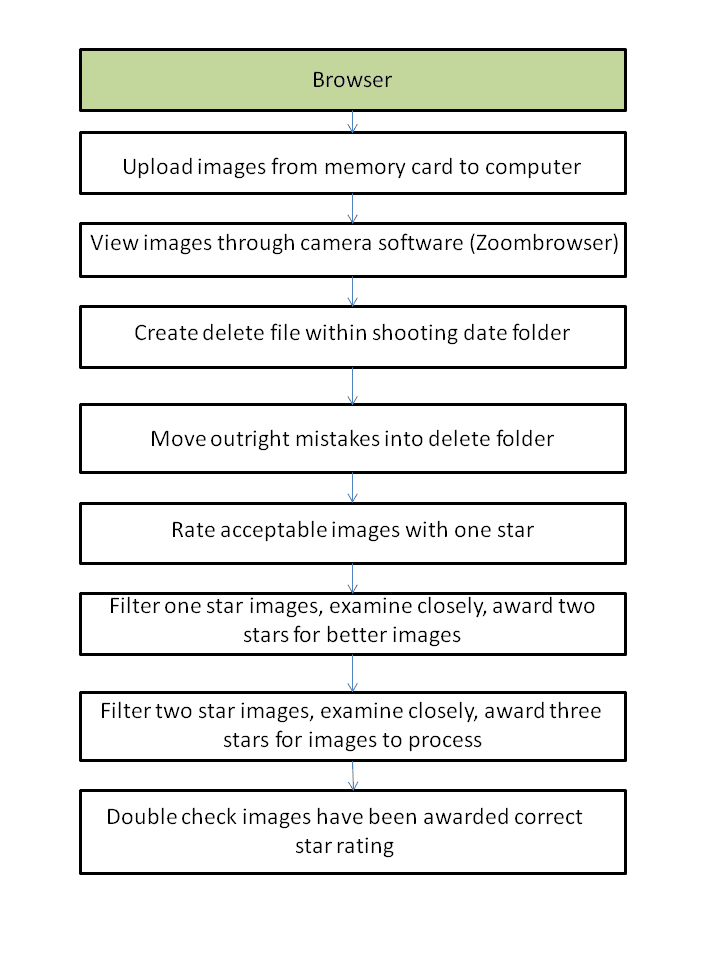
Having arrived home, I uploaded the images from my memory card to the computer using my Canon software Zoombrowser. This allowed me to file the images in a folder with the day’s date on it.


I started with 155 images and needed to choose 6-12 for the final selection for procession, so use the rigorous process I have developed within Zoombrowser to enable me to select images. By creating a delete folder, I was able to move across any outright mistakes (such as no rider or completely out of focus).

By awarding 1 star to any photos for deletion, I could filter all the one star photos and drag across together thus saving time. This removed 31 of my images, so I had 124 still to sort.

I looked through all the remaining images, (enlarging to 1:1 if necessary) to award 1 star to images which fitted the following criteria: in focus, shows action (movement of bike) or emotion, composition, perspective, lighting, position of legs, facial expression. I filtered these by the star rating to show 65 images.
![clip_image002[10]](https://blogger.googleusercontent.com/img/b/R29vZ2xl/AVvXsEh-plLQ6OX6LBWgcxs_FbEM9R_quFGi0kO0PGfQcerJsYW1KarQOZcGFbhZbxd5xbyyLHCQdh5n0JUJsmZ9pJSte6KkRuAvZs12x3wY6D3InySI4pwB1tbTC0uJZZ-SAvgLNPq9NRFU0GA/s1600-h/clip_image002%25255B10%25255D%25255B2%25255D.jpg "clip_image002[10]")
Out of these 65 images, I used the same process to look more critically, awarding two stars for the better images leaving 27 images.
For me, this flowchart worked well when using jpeg images. I have worked through it a few times since the editing exercise and would not change anything at this stage. I considered deleting the awarded stars in the delete folder, but by the time two and three stars are awarded and filtered, the one stars are not visible. To leave them in saved me time.
Flowchart 4: Processing


I created a 3 star folder to drag the 3 star images across into for ease of locating the images in Photoshop. It also allowed me to run a slide show of the final images to double check them before processing.
Creation of a sub folder –e.g. 3 stars enables me to find the images for processing easily and open them all together.

Flowchart 5: Archive

I looked at each image individually. By opening a duplicate layer and making changes to the image, I was able to change an image without altering the original image. I followed the same flow for each image – create duplicate layer, open in curves to check histogram for shadow and highlight clipping, altering if necessary to give image the impact required, cropping if necessary, sharpening if necessary using unsharp mask and flattening the image. One of the limitations of my version of zoombrowser is that image numbering does not allow viewing of images in number order when numbers such as 001 are used. I was not aware of this as I tend to call images by a name. I decided for this assignment to call images 001, 002 etc and still leave the original image number for identification. During my last course, I found by leaving the image number on the name, I could find the original easily if I needed to resize the image. Opening the images in Windows Picture Library displayed the images in the order I wished 001, 002 etc. This too worked well at this level. I aimed to get the images as correct as possible leaving me with little post processing work to do.
I backed up my final images on my hard drive, uploaded them into my blog as jpegs and inserted them into my Assignment as a jpeg. What I did not add into my flowchart is that I would copy the final images across into a folder set up for this course to allow easy access when preparing for submission at the end of the course. I did not want to print these images at the moment and so I have not included “print” on my flowchart.
 |
| 1/125 F4 ISO400 24mm |
 |
| 1/125 F4 ISO400 65mm |
 |
| 1/125 F4 ISO200 24mm |
 |
| 1/125 F4 ISO100 24mm |
 |
| 1/125 F4 ISO100 24mm |
 |
| 1/125 F4 ISO400 24mm |
 |
| 1/180 F5.6 ISO200 15mm |
 |
| 1/90 F5.6 ISO200 20MM |
 |
| 1/125 F8 ISO100 70MM |
 |
| 1/350 F4 ISO400 60mm |
 |
| 1/250 F4 ISO200 45MM |
 |
| 1/125 F9.5 ISO100 24mm |
Whilst reading around the subject of workflow, I came across an interview of a young mountain bike photographer, Nicholas Losacco. When asked about his work, he stated that he likes a “shot that’s in context [meaning] a shot that shows where the rider was and where they are going”. Losacco (2013) I empathise with that, and have strived to show some of the trail in my images. This was an area which I had not thought about before I read it, and it led me to experimenting with a different lens (10-20mm) to enable me to show more of the area around the jump. I also had to search out areas of track especially the berms, where camera perspective allowed me to show where the rider had come from. A lot of mountain bike photography is taken for magazines.
Thinking about how my workflow differs from other photographers led me to consider the work of professional photographers who would be under a time limit to achieve the shots they are asked to take. They would have the skills required and not need a practice session. Kit could well include a strobe light to light the background and flash, and the professional photographer may use a selection of lenses including an F2.8mm lens. The shooting may include a day’s shooting over more rugged and interesting terrain, although still by bike, and perhaps covering photos for different subjects – e.g. technical riding skills, well ridden classical bike route, bike on test article, portraits of riders. I would expect that initial processing would be similar to my system, although images may be emailed or sent via the web to publishing companies. They may add key words to their images and may send low resolution images in a contact sheet, so an agreement can be reached on which ones to use. Colour optimisation may be achieved before sending to the publishing company.
Adaptations I made to my existing workflow included reviewing histograms at the shoot and altering my camera settings where possible. I now set up a delete folder which I delete when I have finished the exercise to save space on my computer and have developed a workable system using the star ratings within the browser software. These have helped speed up my workflow and enabled me to check my work with ease. I have read around the subject of including key words at the processing stage and will be trying it out. I will also be writing a list of shortcuts for Photoshop to keep handy when using the software.
In this assignment I devised a workflow suitable for taking images of MTB riders. It fits my style of photography at this level and will be able to grow with me. For example, in flowchart 1 (preparation), the kit box can be changed along with the personal equipment for what the day may entail. I may find that I need to put more work into the preparation, or require more detailed boxes. I am a list maker, so I see the list becoming longer. Flowchart 2 (shooting) will stay the same I think for the foreseeable future. Flowchart 3 (browser) seems to work well at the moment and will have key words added to it once tried and tested. Flowchart 4 (processing) will change with me. For example, this exercise was done using jpeg images because of the processing speed required by my camera. I do use RAW and will be looking at the RAW browser software the next time I take photos in RAW. I see this flowchart being developed as I learn new skills. Flowchart 5 (archiving) will be added to if I print my images. I found this assignment useful because I began to see that I already had a developed system in place and there are additions which I can build in to improve my housekeeping and enable me to speed up my workflow.
Gulbins, I Steinmueller, U, (2010) Digital Photography Workflow Handbook, Rocky Nook, p41
http://www.imbikemag.com/issue24/?page=83 accessed 7/7/13
Bibliography
Freeman Michael (2010) Mastering Digital Photography, The Ilex Press, Lewes
Freeman Michael, (2011) The Digital SLR Handbook, The Ilex Press, Lewes
Gulbins, I Steinmueller, U, (2010) Digital Photography Workflow Handbook, Rocky Nook, Germany
http://www.imbikemag.com/issue24/?page=83 accessed 7/7/13 http://www.popphoto.com/how-to/2012/08/tips-pro-shoot-better-mountain-bike-photos accessed 19/6/13 http://www.digitalcameraworld.com/2010/02/12/mountain-biking-photography-tips/ accessed 19/6/2013 http://allphotobuzz.blogspot.co.uk/2010/04/mountain-bike-action-top-tips-for.html
Reflection – assess against course criteria
Demonstration of Technical and Visual Skills – materials, techniques, observational skills, visual awareness, design and compositional skills Set up of camera, use of lenses to create effect I am looking for, observational skills – top against sky (lack of contrast) design – practicing to get desired effect with action shots
Quality of outcome – content, application of knowledge, presentation of work in a coherent manner, discernment, conceptualisation of thoughts, communication of ideas Mix of images, knowledge applied to work flow chart and images, work presented coherently, began with an idea which was developed (see also test shots on blog for development of ideas)
Demonstration of creativity – imagination, experimentation, invention, development of a personal voice Deciding how I wanted an action shot to look and practising, experimenting – reading something, trying it out and evaluating, then re-reading and further practising,
Context – reflection, research, critical thinking (learning log) Reflected, researched and added a couple of references to the work. Looked at work of other photographers.
No comments:
Post a Comment