I took an image I had previously taken with a range of tones which I thought would take an increase in contrast.
Original
I originally converted the image into black and white using the greyscale method. However, reading further around black and white photography, I learnt that some methods of conversion do not keep the original pixel values and so are inflexible when it comes to creativity. Beardsworth (2012) takes methods of conversion into black and white and explains why it is destructive, but also why photographers like some methods. I decided to revisit this exercise after reading his chapter to embed better practice into my processing and creative skills.
>cloned dust spot
New adjustment layer > black and white
Preset – none > green filter yellow filter
Red – 40% > 50% 120%
Yellow – 60% > 120% 110%
Green – 40% > 90% 40%
Cyan – 60% > 50% -30%
Blue – 20% > 0% 0%
Magenta – 80% > 0% 70%
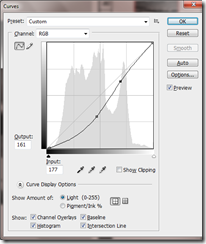
Adjustment layer > curves
> set black and white points
> change histogram to “S” curve to make the image appear as if a storm is coming
> Flatten image
 |
| s curve alteration green filter |
 |
| s curve alteration yellow filter |


I found the benefit of using Beardsworth’s (2012) method was that I could go back to any layer and tweak if necessary.
Colour version
I took the same image and manipulated it in a similar way.
Cloned dust spot
New adjustment layer > filter > green (70%)
New adjustment layer > curves > used a curve as similar to the first image as possible by drawing the black and white version
Flatten image
The green filter has changed the image by adding a colour cast. The sky and water look much more striking on the black and white version. The highlights have been accentuated to show the last bit of sunshine that happens before the storm comes. Without using the green filter, the effect is more striking and shows a bright sunny day.
Whilst researching the next part of this exercise, I came across a chapter on use of coloured filters in black and white image processing. Freeman(2008) suggests using a yellow filter to darken the sky. I re-did the black and white conversion, (above - labelled yellow filter) and I agree that the sky is darker.
High key treatment in which the entire brightness range is shifted up the scale
This image of a tree in the mist provided me with what I thought would work as high key. I decided I wanted to keep the feathery grass as light as possible to add a contrast in texture against the grass, keep the misty sky light and increase the contrast of the tree.
> crop
> new adjustment layer > black and white
> new adjustment level > levels > set black and white points > move midtones towards right (value from 1 to 0.82)
The tree required enough contrast to stand out against the background and become the dominant feature. The colour version did not differ much from the original colour version. However, I did look at adding a high contrast red filter (more detail in background , lightened foreground, made the feathery grass stand out) and increased the contrast of the tree, but the image contained too much detail to be effective.
Bibliography
Beardsworth, J (2012) Advanced black and white photography, Ilex Press, UK
Freeman, M (2008) Mastering digital photography, Ilex Press, UK


No comments:
Post a Comment