Dust spots
The first part of this exercise looked at removing dust from an image. I had been used to using the clone stamp tool to remove dust as one of my lenses has dust on it that appears in the same place every time. I read up on how to use a tool in light room to remove dust and was surprised at how simple it sounded.
Taking one of the original images taken for my last assignment which I knew had dust in the sky, I viewed it in Lightroom. There were 4 visible dust spots.
Using the following method, I removed the dust spots:
Develop > spot removal tool > check size (alter size with slider) > check opacity (100%)> left click > close
(No further alterations made)
 |
| Original JPEG |
This worked effectively and remarkably quickly and easily.
I had used the clone method in Photoshop to remove dust spots. I will adopt the above method when appropriate.
 |
| Dust spots removed in Lightroom |
I consider it acceptable to remove dust spots like this from an image because when I viewed the original image, there was no dust present to the naked eye. I was quite happy to remove it.
N.B. The difference in these two images is not intentional. The JPEG was uploaded straight to Google Picassa from my computer with no processing. The RAW and JPEG image were looked at together as one image in Lightroom, exported back to my pictures and uploaded to Google Picassa. The only alteration made was the dust spot removal. I think the difference in brightness and contrast is that between the unprocessed RAW and the JPEG images.
Lens flare
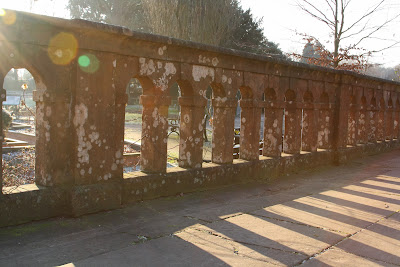
Unable to find an image on the OCA student website, I searched through some images of mine for lens flare. This was taken last year when I was learning about edge lighting and I kept it for reference of how not to achieve edge lighting.
This image would normally have been deleted because I think the lens flare detracts from the image. There are occasions where it can be used to add impact and creativity. My son had a BMX poster on his bedroom wall with the rider in mid air with a lens flare which added some drama to the image.
18/1/14 Revisiting Chase Jarvis's website, I noticed that he had a few images where he used lens flare to enhance his images. It made me question whether it enhanced or took away anything from the image. Personally it is not a style I would adopt for this image because I would prefer to see the runners, but it shows the weather conditions of the moment. Scrolling forward to the runner on the beach, I appreciate the lens flare and position of the sun because it adds a drama to the runner.
18/1/14 Revisiting Chase Jarvis's website, I noticed that he had a few images where he used lens flare to enhance his images. It made me question whether it enhanced or took away anything from the image. Personally it is not a style I would adopt for this image because I would prefer to see the runners, but it shows the weather conditions of the moment. Scrolling forward to the runner on the beach, I appreciate the lens flare and position of the sun because it adds a drama to the runner.
I opened the image in Photoshop as a JPEG > duplicate layer > clone stamp > selected darker, similar area and removed polygons > flatten image
I also considered what this image would look like if I used the image without the polygons and applied an S curve to bring out the detail. The wall looks more three dimensional but the lens flare is still distracting. So this image should be binned.
(No further alterations applied)
 |
| Original |
 |
| lens polygons removed |
 |
| S Curve applied |
No comments:
Post a Comment