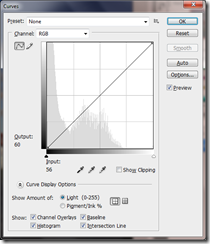
Taking an unprocessed jpeg image, I opened it in Photoshop and converted it to 16 bits using the following process:
Image-mode-16 bits
I questioned the difference between 8 and 16 bits because it was a term I have seen when converting from RAW to JPEG but did not understand its significance. Having read around the term, I now understand that 8 bits are made up of less colours than 16 bits. The numbers were a little mind boggling, but basically, in computer language, 8 bits are made up of 2 to the power of 8 equalling 256. When 256 shades of red, 256 shades of green and 256 shades of blue are multiplied together, there are just over 16 million colours available. With 16 bits, the numbers are higher because it is made up of 2 to the power of 16 and when multiplied again, the number results in trillions of colours. The reason for using 16 bits became clear at the end of the exercise. More space is required to save the image as it is larger. Also jpegs only work in 8 bits.


Opening curves (Image-adjustment-curves) (ctrl m), I adjusted the curve to make the tonal value darker by shifting the pixels to the left hand side.

This is similar to what my camera sensor sees.

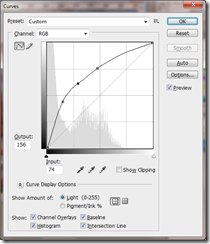
To push the image back to where it was, the curve has to be reversed so that it looks like this: (Gamma correction curve). This was more difficult than I expected to get it absolutely right. One small movement of the curve and the tones became darker or lighter depending on where the curve was placed.


This is the curve which would take my image back to about where the original image was, and when the new histogram is viewed it is very similar to the original image. The difference was in the saturation of the red. On the final image, the red was slightly darker, although the sky was an exact match.
The image which has been darkened and lightened to show more noise in the shadows and darker areas such as the sea because they have been lightened.

Left: Original Right: Altered
Looking at both images side by side, more noise is shown in the image which has been darkened and lightened (gamma correction curve). The noise was present before the image was altered, and the processing has exaggerated the effect. The course material explains that this happens because the shadows area has been lightened so strongly. This is similar to the effect that would be created if the image was lightened in photoshop. I had seen this effect during a previous exercise when I increased the ISO to see if I could take an image without using flash. As I brightened a particular part of the photo in photoshop, the noise became visible. I now have more of an understanding of why this happens.
Bibliography
http://www.photoshopessentials.com/essentials/16-bit/ accessed 15/7/13
Gulbins,I Steinmueller,U,(2010) Digital Photography Workflow Handbook, Rocky Nook, Germany (p144)

No comments:
Post a Comment